Practical and unique ways to store tools and supplies
By Shawna Kulpa

It’s no wonder that most jewelers are tool junkies—it can take a lot of tools to create beautiful works of metal art. But all those tools and supplies can mean a lot of potential bench and shop clutter. Which is why most jewelers follow Benjamin Franklin’s motto: “A place for everything, everything in its place.”
Even if they’re not, shall we say, born organizers.
“I know myself, and I know I’m messy and will lose things,” admits John de Rosier of John de Rosier Contemporary Jewelry Design in Albany, New York. De Rosier has become well known in the industry for his inventive storage solutions. “People think I’m super organized, but I’m not. I’m obsessed with building systems that work—I want to spend my time creating, not looking for things.”
In this article, you’ll find glimpses into how de Rosier and several other jewelers have devised ways to ensure they can do just that. Whether you’re naturally neat or, like de Rosier, don’t want to waste time, you’re sure to find ideas for how to keep tools and supplies out of the way but close at hand.
John de Rosier
John de Rosier Contemporary
Jewelry Design
Albany, New York

The Need for Speed
De Rosier admits that he’s gone a little crazy in the past with organizing his shop, but he’s “mellowing.” Even in his mellowest days, though, he’s still on the lookout for ways to improve the way he works, particularly when it comes to speed.
De Rosier used to store his burs in a standard bur block. However, he found that when he was trying to work quickly, he’d wind up with burs scattered all over his bench, and he didn’t want to take the time to put them all back. Initially he tried using glass jars to store his burs by type, but determined that they were too easy to knock over and spill.
Desiring something weightier, de Rosier decided to make his own containers using copper brass pipe. To make them, he simply soldered part of a pipe to a brass plate. “They’re heavy, so they can’t be knocked over,” he says. “They’re tall enough so that they hold the burs but still allow me to see what I have, and they’re narrow enough that the burs aren’t so splayed all over the place.”
To help keep his bur containers organized, he drilled holes into a small pullout drawer in his bench to fit them. This keeps the ones he doesn’t need out of the way, while allowing him full access to the ones he does. And when he doesn’t need any of them, the drawer easily slides away so the burs can’t be knocked over and spilled.
“I find that the cups are small enough that I can have several on my bench at once, right in front of me,” he says. “They’re very space conscious and easy to manage. I like it better than the bur block. I couldn’t go back to that now.”
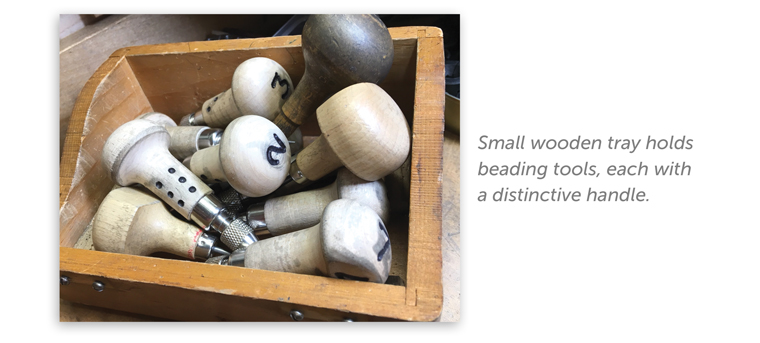
His new system had him looking around at similar ways to store additional bench tools. He’s begun using small trays, often made from whatever he happens to find in his recycling bin, to hold tools such as wheels and beading tools.
“It’s a very visual system,” he explains. “If I need a wheel of a certain abrasive, I grab that tray. When I’m done, I just throw the wheel back in. I don’t have to worry about returning it to a specific hole or block.”
In the case of his beading tools, each of the tools has a large numbered handle that makes it easy for de Rosier to quickly find the one he’s looking for. “My eyesight is not what it once was, and this makes things easy to see without having crystal clear clarity. I need to be able to see what I’m grabbing, and these adaptations have been a way for me to bring things up and see instantly what I need.”
When not in use, the trays sit on shelves he built at the back of his bench so that they’re out of the way but still within view. “I like to have things visually available so I can find them more easily,” he says. “If you can’t see it, it’s going to be harder to find.”

Hanging Around
Metal often takes a beating in a jeweler’s workshop. It’s one of the reasons why many jewelers are often in search of a good tree stump: It provides a sturdy work surface that can easily accept the hammer blows that jewelers rain down upon it. For easy access to those hammers, many jewelers will wrap a tool belt around the stump.
In lieu of a tree stump, de Rosier found himself in possession of a larger butcher’s block that he thought would make an excellent hammering surface. “It’s designed to absorb blows, the same kind of energy we deliver when hammering,” he says.
Unlike a traditional tree stump, the block has a large work surface, allowing de Rosier to spread out his work. But it’s what’s underneath that’s really impressive.
“I couldn’t bring myself to staple a belt to the side of the block,” he explains. Instead, he mounted his block on a platform constructed from plywood and piping and, under the block, added a slatted wooden storage tray from which to hang his hammers. He attached drawer slides and a handle to the tray, allowing him to easily slide the unit out.
“I can pull [it] out, grab the hammer I need, and slide it back in,” he says. “I love it!”
In addition to holding a variety of hammers, the rack also has a section where de Rosier hangs file folders containing his sandpaper and polishing papers, all sorted by grit.
_
Linda Kaye Moses
Plumdinger Studio
Pittsfield, Massachusetts

It’s a Wrap
Linda Kaye-Moses of Plumdinger Studio in Pittsfield, Massachusetts, doesn’t see the need to reinvent the wheel when she’s looking for ways to organize her tools and supplies. Instead, she seeks out easy and practical solutions.
Because she uses her pliers and cutters frequently, she used to store them on top of her bench. Eventually her collection grew to the point where it was taking up too much valuable real estate. Noticing that her bench had a nice, deep drawer for storing things, she set out for a home goods store and managed to find some hand-towel bars that were just the right height to accommodate her tools.
Installing the small towel bars in the drawer was a cinch. She even wrapped the bars with the same colored tape she uses to color code her tools. “The tools are readily accessible,” she says. “And when I’m done, I can easily put them back where they belong so I get exactly what I need the next time.”

Show Your Colors
Kaye-Moses is long a believer in repurposing old things, especially when it comes to containers that she can put to use in her shop. A fan of yard sales, she stumbled upon a white storage chest with long and wide but shallow drawers.
“I don’t know what it was originally designed for,” she explains. “I think it might have been from an old hardware store, where they needed to have a place to store screws, but I can’t guarantee that.”
Although she doesn’t know the original purpose of the chest, she didn’t hesitate to put it to work in her studio. It now serves as her gemstone treasury. Rather than organize the stones by type, she keeps them separated by color.
“I like that with the shallow drawers, I’m not piling stuff on top of each other,” she says. “Generally, I don’t buy my stones with a specific purpose in mind; I buy what appeals to me.” The shallow drawers allow her to quickly see all of her options in a specific color, which can help lead to sudden bursts of inspiration.
Edie Malin
Creative Inkling
Hatboro, Pennsylvania

To Die For
Edie Malin, the creative director and lead instructor of Creative Inkling in Hatboro, Pennsylvania, had long looked for something to hold her growing collection of pancake die holders. “When I first started looking for storage, I went to places like Ikea and sometimes to flea markets, but I never found anything,” she says. Malin had considered using some type of CD tower, but most of the ones she found were made of acrylic and she didn’t think they would support the weight of her metal dies.
In the meantime, she continued storing her dies in wooden boxes. She also installed magnetic strips in her shop and started attaching some of the dies to them, which worked well until her die maker switched to using non-magnetic steel.
One day, she was looking at new wall-mounted wine racks when lightning struck. “I thought I could figure out a way to make wooden holders with slots that would hold up [the dies],” she says. She discussed the idea with her husband, whom she describes as “handy.” He went out to his wood shop and came back in with “a stick with slots in it.” After refining her idea, they headed out to buy two 6-foot oak 2x2s. Using his miter saw, her husband cut each board into four 18-inch wooden strips, each with 19 slots cut at an angle.
“My workspace is in the basement and the walls aren’t high, so I knew how much space I had to work with,” she explains. After adding holes to the top and bottom of each strip, she screwed them into the wall, using anchors due to the weight of the metal dies. (“They’ve been up there for one and a half years, and nothing has pulled down—and I’m not the most careful person!” she says.)
The angle of the slots allows her to see the top edge of each die. Although she keeps the dies somewhat organized by type, she labeled each with a Sharpie so she can easily find the one she needs.
Her husband also constructed a slightly thicker version that’s attached to a wooden base. Malin keeps it on her bench to store the dies she’s using. “He used a 2x3, which is stronger...it needed something in the back to support the weight.”
Because her husband is a stickler, he used a file to smooth the edges of the holders to make them neat, but she notes that constantly sticking metal into the slots will eventually accomplish the same thing. And, because they used oak to create the holders, they didn’t bother to stain them.
“They’re so simple and inexpensive to create—I don’t know why I couldn’t find anything like them!” says Malin.
Mike Brenner
Up, Up, and Away
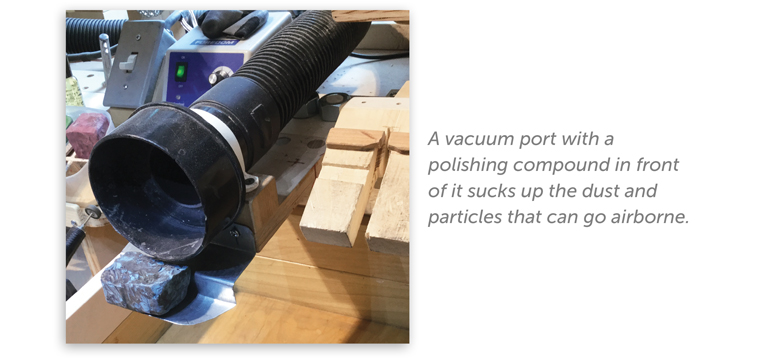
Mike Brenner likes to keep his shop in upstate New York clean: To help suck up the dust and particles that can go airborne, he mounted a vacuum port on top of his workspace. It sits on a slide that allows Brenner to pull it forward when needed or push it back and out of the way when it’s not. He also likes to keep things efficient, so he found a way to mount his polishing compound just in front of the vacuum port.
“It took me a while to come up with a simple way of doing this, but I took 24-gauge sheet metal and added a metal lip to the front of the port,” he says. He used sheet metal screws to mount the lip to the port’s wooden support.
“I can put a chunk of whatever polishing compound I’m using on that lip, which sits a quarter of an inch below the port, and when I touch the polishing wheel to the compound, all of the polishing fine particles get sucked into the vacuum,” he says.

Make Your Mark
Often, in order to achieve perfect symmetry in a piece of jewelry, measurements must be taken and clearly marked. As a result, many jewelers like to keep a Sharpie marker nearby. But when one hand has to hold the piece in place, freeing the marker from its cap can be difficult. You could rely on your teeth to remove the cap, but why not protect your teeth by taking a page out of Brenner’s book.
Brenner’s workspace has evolved over time as he’s found ways of keeping frequently used items accessible. In the case of his Sharpie, it wasn’t just a matter of keeping it nearby, but also of finding a way to easily grab and use it one-handed. For him, that meant a trip to the hardware store for a 2x4 piece of wood. He cut it down to 6.5 inches long and drilled into it two holes just large enough to fit the cap of a Sharpie marker. (He also added two square strips of wood between the holes to form a horizontal cradle for a fine felt-tip marker.)
He then roughed up the surface of the marker caps, cut off their clips, and used epoxy to secure them, top down, into the holes.
“I can pull the pen right up one-handed,” he explains. And when he’s done using the marker, back into the secured cap it goes. “It’s very efficient because I don’t have to put down the workpiece. And it’s as simple as can be.”
To secure the holder, Brenner used a simple bracket that allowed him to screw the holder right to his bench.

You Spin Me Round
Given the handiness of their design, lazy-Susan containers are a popular sight in many a jeweler’s workshop. And it’s easy to see why: They allow jewelers to store and quickly access a number of tools, and because they store things vertically, they don’t take up a lot of valuable real estate on the bench.
When Brenner was looking for a way to store his files, he wanted something practical and efficient. And since lumber is readily available, he opted to make his own specialized lazy-Susan file holder. Using construction lumber, he cut out a disc measuring 7 inches in diameter to serve as the base. Around the perimeter of the disc, he drilled a series of holes to accommodate his files. “There are 18 holes for files, and I penciled in the cut number of each file below its hole, so it’s easy to pick out the file I want,” he says.
He added additional levels to the holder to elevate a PVC pipe that he uses to hold his assortment of saw blades. The pipe measures 4 inches high and 2 inches in diameter. Brenner used an end cap on the bottom of the pipe so it would rest flat and, to prevent it from falling off, he glued half-inch wooden dowels around the edge of the top level.
A screw in the center of the wooden arm allows it to spin, making it easy for Brenner to quickly find the tool he seeks. “Everything I make is generally very straightforward,” he says. “This is practical and efficient, and it was uncomplicated and very inexpensive to make.”

Easy Pickings
When Brenner creates storage solutions in his shop, he does so in a way that allows him to work easier. “The easier it is to work, the more energy you have to do your work,” he says. In addition to liking to keep items accessible and out of the way, he also wants to keep things visible—which is why he stores his wire solder in a series of baby food jars.
Each jar contains a different temperature of solder, and the tops are labeled accordingly. Organized in a small wooden holder at the back of his bench, the jars have a hole in their lids through which Brenner feeds the wire.
“The wire sticks up straight out of the hole so I can clip off what I need and the rest stays in the jar,” he says. In addition to keeping the wire organized, the clear jars allow Brenner to monitor how much material remains.
David Lee
David Lee Jeweler
Mason City, Iowa

Through the Looking Glass
Storage containers are often designed with functionality in mind; aesthetics is usually a second thought, if it’s considered at all. But some jewelers have found ways of creating practical storage that also looks beautiful.
When David Lee of David Lee Jeweler in Mason City, Iowa, switched to using the GRS GraverMax engraving system, he realized that he could free up some space in the bench drawer that held his old gravers. In that drawer he had installed a strip of wood with slots to accommodate his many gravers and their large handles. Since the GraverMax features a removable handpiece that can be used directly with the gravers, Lee no longer needed to keep them spread out in the drawer.
Inspired by the domed plastic holder his beading tools came in, Lee decided to convert a pocket watch display dome into a unique home for his gravers and their new handle. He drilled a series of holes around the wooden base of the display to accommodate the gravers. In the center of the base, he drilled a shallow pocket to fit the end of the handpiece.
“It keeps everything organized and makes it easy to select the proper shape and size,” he says. “And it keeps the gravers from rubbing against one another and damaging their edges.”
Although the dome is made of glass, Lee says it doesn’t require any extra care.
“I keep it on the back of my bench,” he says. “I use my gravers quite a lot, and I do take care when I remove the glass, but it’s not super fragile.”